
Why Is My Exterior Paint Peeling and Bubbling? The Real Culprit
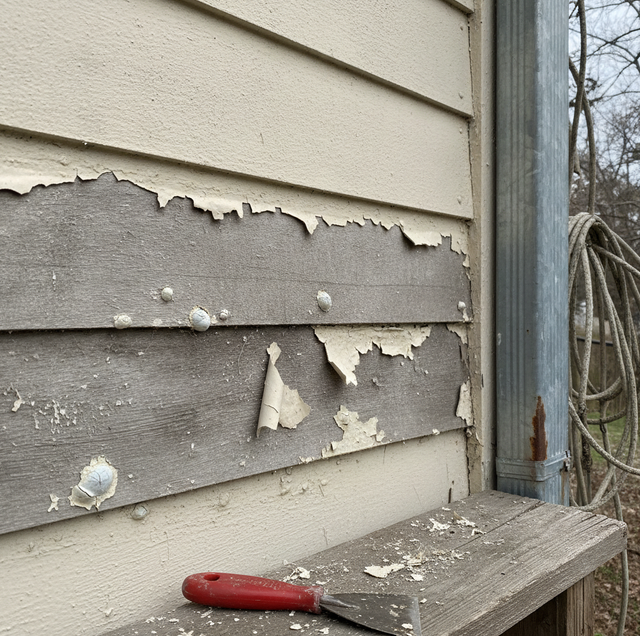
Paint that peels and bubbles is telling you something, and it is rarely about the paint alone. When a coating lifts into blisters or flakes off a wall, the film has lost its grip on whatever it was supposed to stick to. Both problems come down to a broken bond, and in most cases, the thing breaking that bond is moisture. Understand where the water is coming from, or why the paint never held in the first place, and the repair stops being guesswork.
Quick Answer: Peeling and bubbling both mean the paint film separated from the surface underneath. Bubbling is the film lifting into blisters, usually because heat or trapped moisture pushes it up; peeling is what follows when those blisters break and flake off. The usual driver is moisture, either pushing out from behind the wall or trapped during application. Fixing it means finding the moisture source first, then scraping, cleaning, priming, and repainting in the right conditions.
How the Bond Actually Fails
A coat of exterior paint works because it forms a continuous film that keys into the pores and texture of the surface. As long as that film stays anchored and stays flexible, it sheds water and holds tight through years of expansion and contraction. Failure starts when something gets between the film and the surface, or when the film was never properly anchored to begin with.
Think of the paint film like a piece of tape stretched across a wall. Press it onto a clean, dry, slightly textured surface, and it grips. Press that same tape onto dust, or over a spot that is quietly weeping water from behind, and it lifts at the edges no matter how hard you push. Paint behaves the same way. The bond is only as good as the surface it lands on and the moisture conditions on both sides of the film.
Once you see peeling and bubbling as a bond failure rather than a cosmetic blemish, the causes sort themselves into three families: moisture pushing from behind, a surface the paint never bonded to, and heat or timing problems during the application itself. Each leaves different clues, and each needs a different fix.
Bubbling: The Film Lifts First
A bubble, or blister, is a small dome where the paint has separated from the surface but has not yet broken. Blisters form when something underneath the film exerts outward pressure. There are two common ways that happen.
The first is heat during application. Paint a wall in direct hot sun, or onto a wall that is already hot to the touch, and the outer surface of the fresh coat skins over fast. The layer beneath is still releasing solvent or water vapor, and if the surface it was applied to holds any moisture, that vapor has nowhere to go but up. It pushes the skinned-over film away from the wall into a blister. This is why exterior work follows the shade around a building instead of chasing the sun.
The second is moisture coming from behind. Water in the wall, whether from a leak, from ground moisture wicking up, from high interior humidity with no path to escape, or from a coating that cannot let vapor through, builds pressure behind the film and lifts it. These blisters often show up in patterns that trace the water: a band near the ground, a streak below a window, a patch under a roofline.
Peeling: What Happens When Blisters Break
Peeling is the next chapter. A blister is a weak spot, and weak spots do not survive weather. Sun, rain, and the daily swing between hot and cool flex the dome until the film cracks. Once it cracks, the edge is exposed, water gets underneath more easily, and the film begins to flake away in sheets or curls. What started as a scattering of bubbles becomes bare patches with ragged, lifting edges around them.
Because peeling grows from bubbling, the two almost always share a cause. If you catch a wall at the blister stage and read it correctly, you can often address the driver before large sections let go.
Reading the Clues: Three Different Failures
The repair depends entirely on which failure you are looking at, so it pays to diagnose before you scrape.
Moisture from behind: Pull off a lifted flake and look at its back. If the back is clean, and the wall behind feels damp or cool, water is pushing out from inside. Look upward and around for the source: a roof or flashing leak, an overflowing gutter, a sprinkler head that sprays the wall, a downspout dumping against the base, or an interior moisture source with no vapor path outward. This is the failure people most often misread, because the paint itself can look fine until it lets go.
A surface the paint never bonded to: Here, the paint failed at the point of application because it landed on something it could not adhere to. The usual offenders are dirt, a slick or glossy old coat that was not scuffed, mildew growing on the surface, or old, weathered paint shedding a fine powder. In these cases, the flake usually comes off with residue stuck to its back, and the failure is spread wherever the prep was skipped rather than tracing a water path.
Heat or timing during application: If the trouble appeared within a day or two of painting, check the conditions. Paint applied in direct hot sun, onto a hot wall, or just before rain or heavy dew arrived, blisters from trapped vapor or a coat that never got to set. Incompatible layers belong here too: a flexible coating laid straight over an old, hard, glossy coat without scuffing and priming will let go because the two never fused.
A few other setups invite failure across all three families. Too many coats, or one coat laid too thick, create a heavy film that is more likely to lift under stress. And fresh masonry that has not finished curing is still chemically active, which brings us to the surface that gives painters the most trouble.
Why Masonry and Stucco Are Their Own Problem
Wood siding has some give and a relatively stable surface. Masonry and stucco are different animals. They are porous by nature and act like a sponge, taking on moisture when it is wet out and releasing it as vapor when it dries. That constant exchange is normal and healthy for the wall, as long as the coating lets the vapor pass.
Cover masonry with a paint that seals it tight, and you trap that moisture behind the film. The next time the wall wants to release vapor, the pressure has nowhere to go, and it blisters the paint off in sheets. This is why masonry surfaces need a breathable coating that lets the wall exhale rather than a dense film that bottles it up.
Fresh masonry and new stucco add a second issue on top of the moisture one. Curing concrete and stucco is highly alkaline, and that alkalinity attacks ordinary paint from behind, breaking the bond in a process painters call saponification. New masonry needs time to cure and lower its alkalinity, or an alkali-resistant primer designed to stand up to it, before it takes a finish coat. Skip that, and even a breathable topcoat can fail.
Fixing It in the Right Order
The single most common mistake is skipping straight to scraping and repainting. If moisture is the driver and you repaint over an active source, the new coat blisters right back, sometimes within weeks. Work the problem in order.
Find and fix the moisture first: Track down and stop any leak, redirect the gutter or downspout, adjust the sprinkler, and give trapped interior moisture a way out. If the wall is simply damp, let it dry fully before anything else. This step is the one that determines whether the repair holds.
Scrape and sand back to sound paint: Remove anything loose, blistered, or flaking, and feather the edges of the remaining paint so the repair blends rather than leaving a hard ridge. You want to end at the paint that is firmly stuck down.
Clean the surface: Wash off dirt, and treat and rinse any mildew so it does not grow back through the new coat. On old, weathered paint, scrub off the chalky powder until the surface no longer leaves residue on your hand.
Prime what needs it: Every bare or patched spot should be primed so the topcoat has a consistent, bonded surface to grip. Use a bonding primer over chalky or slick areas, and an alkali-resistant primer on fresh masonry. On stucco and masonry, choose a breathable masonry coating so the wall can keep releasing vapor.
Paint in the right conditions: Follow the shade, avoid painting a hot wall or in direct sun, and check the forecast so rain or heavy dew does not arrive before the coat has set. The right conditions are as much a part of the job as the right product.
Climate Cuts Both Ways
It is tempting to blame the weather, and climate does play a role, but it works in more than one direction. High humidity keeps walls damp and slows drying, which is why moisture-driven blistering and mildew get a foothold. At the same time, strong sun and heat push the opposite failure, skinning fresh coats too fast and cooking a hot wall so trapped vapor blisters the film. A durable exterior job has to account for both the wet side and the hot side, not just whichever one happens to be on your mind the day you paint.
A Safety Note Before You Scrape
Two cautions are worth stating plainly. If your home was built before 1978, the existing paint may contain lead, and sanding or scraping it can release hazardous dust. Have the surface tested and follow lead-safe practices, or bring in a professional, rather than dry-scraping it and breathing the results. And because exterior repairs mean working at height, set ladders on firm, level ground, keep three points of contact, and do not overreach. Neither the diagnosis nor the fix is worth an injury.
Frequently Asked Questions
A simple test tells you whether the trouble is active. Press a blister: a live one that is still soft or refills with air or moisture means the source is active, and it will reblister if you paint over it now. A dry, brittle, empty blister is old damage you can scrape and recoat once the wall is dry. Running that press test across a few blisters sorts the wall into spots that still need the driver fixed and spots that are just waiting for prep. It saves you from repainting over a problem that is still working.
A rule of thumb is to keep the surface below about 90 degrees and out of direct sun, and to check the dew point so you are not painting when the wall will sweat overnight. Both extremes trap vapor under the skinning film: a hot wall skins the top too fast, and an overnight sweat feeds moisture in from the back. Staying inside that temperature window and clear of the dew point keeps the coat setting evenly instead of blistering. Watching those two numbers is what separates a coat that cures flat from one that lifts within a day.
A moisture meter reading taken on the substrate confirms it outright. If you do not have one, tape a square of plastic sheeting to the wall for a day: condensation forming under the plastic means moisture is moving through from behind rather than sitting on the face as a surface bond problem. A dry underside of the plastic points you back toward prep or scent issues instead. Either the meter or the plastic square turns a guess into a definite answer before you commit to a repair.
Yes. Old weathered paint slowly sheds a fine powder called chalk as its binder breaks down in the sun. When a new coat goes on over that powder, it grabs the loose chalk instead of the wall underneath, so it has nothing solid to hold to and peels off, carrying the powder with it. The fix is to wash the chalk off completely until the surface no longer leaves residue on your hand, then use a bonding primer that locks down any remaining fines before the topcoat.
Fresh stucco and concrete need roughly 28 days to cure and drop their alkalinity before painting, or else an alkali-resistant primer to stand in for that wait. On top of the cure question, a breathable mineral or elastomeric masonry coating lets the vapor out instead of bottling it into blisters. Wood does not carry that alkaline load or hold vapor the same way, which is why it gives less trouble. Respecting the cure clock and choosing a coating that breathes is what keeps a masonry finish flat.
Even after the leak is fixed, the wall still has to dry out, often for several days, and a meter reading is worth taking to confirm it before recoating. Once it reads dry, bare spots get a bonding primer so the fresh coat has something solid to grip. Painting over still-damp masonry or wood just blisters again within weeks, because the trapped moisture keeps pushing on the new film. Waiting for a confirmed-dry substrate and priming the bare areas is what makes the repair hold instead of repeating.
Book an exterior repaint assessment — get to the root of the failure so the fix lasts, not just a fresh coat over the same problem. Vinicio Painting serves Hialeah Gardens, Miami Lakes, and Doral. Call (866) 444-1226.
