
Why New Drywall Needs Different Prep Than Old Walls
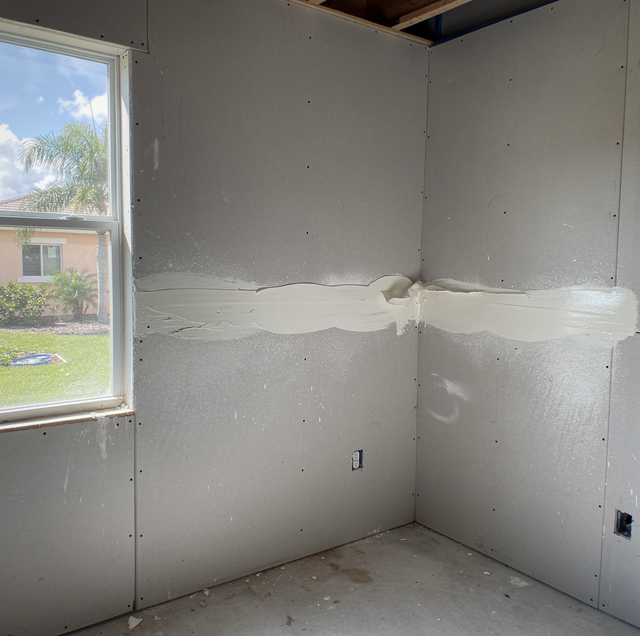
Paint a brand-new wall the same way you'd touch up an old one, and you'll often see it: patches that look duller or shinier than the rest, a faint outline of every taped seam ghosting through the topcoat, or color that seems to shift depending on where you stand. None of that means the paint job failed. It means the wall underneath was never prepped the way new drywall actually needs.
Why New Drywall Absorbs Paint So Unevenly
A finished drywall wall is really two different materials sitting side by side under one coat of paint. The paper facing on the drywall panel itself is fairly uniform and only moderately absorbent. The joint compound, or mud, spread over every seam, screw dent, and corner bead is a completely different story: it's far more porous, and it soaks up paint like a sponge compared to the paper around it.
Paint applied straight onto that surface gets pulled into the compound faster than into the paper, so the same paint dries to a slightly different sheen and shade over every seam. Painters call this effect flashing, and it's most visible in raking light, when sunlight or a lamp grazes the wall at a low angle and throws every seam and screw dimple into relief.
The Role of a PVA Primer-Sealer
The fix is a dedicated PVA (polyvinyl acetate) drywall primer-sealer, applied to the entire wall before any texture or topcoat. PVA primer isn't the same product as a general-purpose stain-blocking primer; its job is narrower and more specific. It soaks into both the paper and the compound, forming a thin, even film that equalizes the overall absorbency of the surface, so the topcoat that follows gets pulled in at the same rate everywhere instead of vanishing into every seam.
Skipping the PVA step and going straight to a premium paint-and-primer product doesn't solve the same problem, because those combination paints are formulated to hide old, already-sealed walls, not to correct the porosity difference between raw compound and drywall paper.
Curing Time and Moisture: Why Rushing Backfires
Joint compound doesn't dry the way paint does; it cures as water evaporates from a thick, still-wet paste, and that process can take a full day or more per coat, depending on thickness, temperature, and humidity in the room. Compound applied in cool or humid conditions, a chilly room or noticeably damp air, generally cures more slowly than the timeline on the bag suggests, and it can stay soft under the surface far longer than it appears from the outside.
Priming or painting over compound that hasn't finished curing traps that moisture under the new film. The wall can look fine for a few weeks, then develop soft spots, blistering, or a persistent musty smell as the trapped moisture works its way back out. Running a fan or dehumidifier in the room during the curing window, and giving compound the full time it needs before priming, avoids that entirely.
Screw Dimples and Fastener Pattern
Every screw or nail holding drywall to the framing leaves a small dimple that gets filled with compound in two or three passes, each wider than the last, to feather the patch smoothly into the surrounding panel. Those dimples absorb paint differently from the rest of the wall for the same reason seams do: fresh compound is more porous than the surrounding paper. On a wall with a tight fastener pattern, closer stud or joist spacing means more dimples per square foot, which is part of why some new-construction rooms seem to need more primer overall than others of a similar size.
Sanding, Dust, and Getting the Surface Truly Clean
Every sanded seam leaves behind a layer of extremely fine gypsum dust that settles into the paper's texture and clings to the wall with static, the way flour dust clings to countertops. A quick wipe with a dry rag doesn't remove it; the dust just moves around and resettles.
Vacuuming the wall with a brush attachment first, then following up with a slightly damp microfiber cloth or a tack cloth, pulls dust out of the surface rather than just relocating it. Primer applied over unremoved sanding dust bonds to the dust layer rather than to the wall itself, which is one of the more common reasons a new paint job peels in thin, dusty flakes within the first year.
Corner Bead Adds Its Own Prep Step
Outside corners get a separate material entirely: a metal or vinyl corner bead nailed or glued over the raw edge, then coated with compound just like a seam. Metal corner bead can develop small rust spots along its edge if it sits exposed to humidity before priming, and the rust bleeds through the paint the same way a water stain does if it isn't caught and spot-primed with a rust-blocking primer first. Vinyl corner bead doesn't rust, but it flexes slightly more than metal, so the compound feathered over it needs a few extra passes to build a smooth transition that won't show as a hard ridge once light hits the corner.
When a Wall Needs Extra Leveling Before Paint
Not every seam needs the same amount of correction. Walls that will sit under strong side lighting, like a hallway with a window at one end or a room with track lighting aimed across the surface, show every seam and fastener dimple far more than a wall lit only from overhead. For those walls, the drywall or plastering crew sometimes goes back over the entire surface with a thin skim coat of compound, feathered out with a wide trowel or a drywall knife, to level out the subtle high and low spots that a coat of paint alone can't hide. Spotting that need during a pre-paint walkthrough, before any primer goes on, is what keeps a wall from looking flat one day and revealing every seam once the sun moves across it in the afternoon.
New-Construction Walls vs a Single Patched Section
A full house of new-construction drywall gets primed uniformly, one pass across every wall and ceiling before any color goes on, so absorbency is consistent everywhere the moment the finish color arrives. A single patch on an existing painted wall is a different problem: the surrounding original paint is already sealed, so only the new compound and any exposed paper actually need PVA primer, feathered a few inches past the edge of the repair. Skipping that feathering step is why a patched section often appears later as a faint "picture frame" outline, even after the color coat looks fine everywhere else.
For walls that will carry a glossy paint sheen or sit under dramatic side lighting, some new-construction jobs specify what's known in the trade as a Level 5 finish: a thin skim coat of compound applied across the entire wall surface, not just the taped seams, specifically to erase any remaining variation in porosity or texture before paint goes on. It adds labor compared to a standard tape-and-mud finish, but it's close to the only reliable way to guarantee zero flashing under a semi-gloss or high-gloss topcoat.
Frequently Asked Questions
One full, even coat is standard for most walls. Heavily patched areas, or compound applied thicker than usual over a repair, sometimes need a second spot coat of PVA over just those sections before the whole wall gets its finish coat, since a single pass may not fully seal a thicker patch.
Inside corners usually get a single strip of paper tape, pre-creased down the center and folded lengthwise so it embeds into both intersecting walls at once, which still concentrates compound in a narrow band and makes that corner one of the more porous strips on the whole wall. Cutting in a dedicated brush coat of PVA primer along inside corners, before rolling the rest of the wall, catches spots a roller often skims past.
Fully cured compound turns a uniform, dull white or off-white and feels hard when you press a fingernail into it; if any spot still looks slightly darker, gray, or feels the least bit soft or cool to the touch, it's still holding moisture and needs more drying time before sanding.
Trapped air bubbles from mixing or from applying compound too thick in one pass rise to the surface as it dries, leaving small craters; a thin skim coat over the affected area, sanded smooth once dry, corrects it without redoing the whole seam.
Paper tape embedded in compound is generally stronger for flat, straight seams and resists cracking better over time, while self-adhesive mesh tape is faster to apply but needs a setting-type compound rather than standard joint compound to resist cracking at the seam.
Textured surfaces have more surface area and more peaks and valleys than a flat wall, so they typically pull in more primer per square foot. Budgeting a slightly heavier first coat, or a second light pass over textured walls, helps prevent thin spots that show through the topcoat.
Getting new drywall right comes down to treating the compound and the paper as the two different materials they are, rather than as a single uniform surface. A wall prepped that way holds color evenly in any light, which is the whole point of doing it before the topcoat goes on, rather than trying to fix flashing after the fact.
Ask about proper drywall prep before your next painting project — even coverage starts before the first coat goes on. Vinicio Painting serves Hialeah Gardens, Miami Lakes, and Doral. Call (866) 444-1226.
